
Welcome to our guide to the best camera lens filters. The world of filters is big and complex, and which filters are useful is likely going to be different for every photographer. It doesn’t just depend on which camera and lens you have, but also on what you shoot. A landscape photographer is going to get use out of different filters than a portrait photographer, who in turn is going to have different filter needs than a wedding photographer.
As such, we’ve split this guide up into different genres of photography, and have polled our team of experts to provide filter recommendations for each one. You may not take every suggestion – it might be only one or two that are useful for your specific brand of shooting. The point of this guide is simply to get you thinking about how lens filters could help you achieve new possibilities with your photography.
If you need an explainer on the different types of filter, you can scroll to the bottom of this page where we’ve put together a full explainer of the key filters we’re talking about in this guide.
Quick Navigation
Best Lens Filter for Landscape Photography
Lens filters are most closely associated with landscape photography. While they have their uses in all genres, it’s landscape shooters who are likely going to own the most different types of filters, and get the most use out of them. Both circular and square/rectangle filters tend to be popular with landscape photographers – there are pros and cons to both, so which type you go with is mostly down to personal preference and/or the specifics of your lenses (again, see the bottom of this page for an explainer of filter types).
We’ve picked the three key types of filters we reckon landscape photographers will get the most use out of, and have provided a few suggestions for each type.
ND filters
Neutral density filters are one of the key tools in a landscape photographer’s arsenal, and we’d go so far as to say they’re probably the first filters you should look at buying. Being able to control the amount of light that enters your lens is critical for capturing long exposure images in natural light, which allows you to create smooth, dreamy effects by slowing the motion of subjects like waterfalls or ocean waves, or create traffic trails with car headlights if you’re shooting urban landscapes.
ND filters come in different strengths, and ideally you’ll want a few different options to hand. The numbering of ND filters can be confusing – you’ll see some referred to by a filter factor number like ND8, and some by their optical density number, which will be something like 0.6 or 0.8. Rather than trying to understand and compare the different scales, it’s easiest just to read the product description and look at how many stops of light the filter is rated for.
If you’re just starting out in landscape photography, it might be worth looking at a kit of ND filters with different strengths, to ensure you’re equipped for different shooting situations. The Hoya PRO ND EX set is a three-filter kit of circular filters covering 3-stop, 6-stop and 10-stop. They’re available in a range of thread sizes up to 82mm, provide excellent colour fidelity, and are stackable for when you need a powerful light-reduction effect.
Alternatively, one of the most popular filters in landscape photography is the Lee Big Stopper. The Big Stopper has a ten-stop impact on exposure, which has the effect of reducing water, clouds and and anything else that may be moving to a smooth, luscious blur. Crafted from high-quality glass to keep the image as colour accurate as possible, the Big Stopper can also be used in combination with other Lee filters once it’s mounted within the separately available filter holder.
Pros:
- Opens up new shooting possibilities that can’t be replicated in software
- Stackable filters allow for increased effect
Cons:
- Some ND filters cause a colour cast that will need correcting
- Can make it more difficult to use an optical viewfinder (as image is darker)
ND grad filters
ND grad filters are also a hugely beneficial asset for any landscape photographer. When shooting in bright skies, it can be very difficult to balance your exposure, even when using ND filters. A simple effective solution is an ND grad filter, which darkens only a portion of the image, meaning you can control the exposure when one area is substantially brighter than another.
In terms of filter format, many photographers prefer to use square ND grads in a holder rather than round ones on the front of a lens. This is because if you have a lens where the front element rotates during focusing, adjusting the focus will immediately ruin your careful placement of your grad transition over the horizon line! Popular options include the Lee 100mm ND grads, which come as a set of multiple filters in different strengths (remember you’ll need the corresponding filter holder to go with them!)
Reverse ND grads such as the Kase Wolverine RGND can also be hugely useful. These essentially work the same way as regular ND grads, except for the fact that the ND effect is strongest in the middle of the filter rather than at the top or bottom. The purpose of this is for when you have a very strong light source towards the centre of an image, which tends to happen when you’re shooting a sunrise or a sunset.
For an all-in-one set, it’s worth taking a look at the Cokin Landscape Kit. Consisting of soft ND grad, blue grad and tobacco grad filters, this kit allows landscape photographers to easily intensify the warmth or coolness in the scene while keeping lighter and darker parts balanced for best exposure. The filters themselves are crafted from a lightweight, organic glass that boasts excellent light transmission and resistance to shocks, with a soft gradient to suit scenes that vary gradually across the frame. As P-series filters they’re designed to be used with the separately available P series holder and adapter.
Pros:
- Enables balancing of bright skies and dark foregrounds
- Can be stacked for increased effect
Cons:
- Can cause colour cast
- Circular grads can be difficult to use with older lenses
Polarisers
Polarisers are useful for a lot of different genres of photography – as we’ll see. However, they can be particularly useful for landscape photographers, who tend to be taking pictures in bright sunlight. A good polariser will cut down on the reflected light and glare and make your colours that much more intense. Also, if you’re photographing a body of water like a lake or river, a polariser will reduce the reflections from the water, making it much clearer.
This is another effect you can’t really replicate in software, so it’s definitely worth having a polariser in your landscape photography arsenal. The Hoya Fusion One Next polarising filters are an excellent choice, available in a range of thread sizes.
Another good choice is the Kenko Real Pro Circular Polarising Filter, which has been constructed to an uncompromising standard. Black-rimmed glass and a black almite frame are used to keep reflections away from images while the slim profile also does the same for vignetting. Furthermore, the Anti-Stain Coating (ASC) ensures that moisture and water droplets easily slip away from its surface to leave your images unaffected.
Pros:
- Intensifies colours and reduces reflections
- Unique effect can’t be replicated in software
Cons:
- Can take practice to get the hang of using
- Some light loss
Best Lens Filter for Wildlife Photography
Wildlife photography is generally a discipline where you’re using fast shutter speeds to freeze the most fleeting of moments. As such, you want to be conservative with using filters, as anything that reduces the amount of light that comes into your lens is going to reduce your ability to shoot at these speeds.
However, that isn’t to say that there’s no use for filters in wildlife photography. A good UV filter can be a useful layer of lens protection, a polariser can be handy for making colours pop, and even an ND filter can have its uses in certain situations, as we’ll see below.
Polariser
Polarisers can be great in wildlife photography. Colour is often a hugely important part of capturing images of wild animals – particularly birds, who you want to show in all their glory – and if you’re shooting in bright daylight, or near a body of water, a polariser is going to be a great asset. There will be some light loss, but it’s generally only a stop or so.
However, many wildlife photographers use big, heavy telephoto lenses, with massive front elements that either don’t take a screw-on filter, or can only accept the most expensive ones on offer. As an alternative, you may want to look into whether your lens has a compatible drop-in polariser. These slot in behind a lens, rather than in front, but can still be rotated in order to fine-tune the polarising effect.
It’s worth doing some research to see if there’s a drop-in polariser compatible with your lens – Canon makes one for both RF mount and EF mount, and Sony also has one for E-mount.
Of course, you may still be able to use the front filter thread, especially if you’re using a standard telephoto zoom like a 100-400mm. Many of these lenses take 77mm filters, like the Urth Circular Polarising filter.
Pros:
- Makes colours pop
- Useful for shooting near water (where a lot of wildlife is found)
Cons:
- Some light loss
- Can be difficult to use with big telephotos
ND filters
Seriously? After all that wanging-on they did about needing to use fast shutter speeds? Yes it’s true that ND filters are unlikely to commonly find their way onto your lens when you’re photographing wildlife. However, some shooters find them useful in specific instances.
Wildlife photography often benefits from using a shallow depth of field – allowing the photographer to isolate the wild subject from its background. However, in bright daylight, this can be difficult to achieve, as you need to use a wide aperture setting, which could potentially blow out your exposure. A workable solution is to use an ND filter, reducing the amount of light coming in and allowing for the use of a wider aperture than would otherwise be possible.
A variable ND filter could be useful here, allowing you to fine-tune the precise intensity of the ND effect. The Urth ND2-400 (1-8.6 Stop) Variable ND filter provides a flexible level of intensity, and can be picked up in larger sizes to fit telephoto lenses.
Pros:
- Allows for use of large apertures in daylight
- Variable ND filters let you adjust intensity on the fly
Cons:
- Specifically situational use case
Macro filters
Wildlife photography doesn’t just have to mean birds and big beasts! There’s a whole miniature world to explore, and macro photography of the tiniest insects can be immensely addictive. While having a macro lens is obviously ideal, it can also be expensive, and so getting a set of macro filters to fit your lens is potentially a much more cost-effective solution.
The Marumi DHG Achromat Macro Lens is a useful screw-on filter, providing a range of options both in terms of thread size and magnification. It simply attaches to the front of any standard lens – and can also be used on a macro lens to further enhance the effect.
Pros:
- Provides macro quality at an affordable price
- Range of size and intensity options
Cons:
- Not the same quality as a true macro lens
Best Lens Filter for Street Photography
Street photography is all about agility, patience and timing, and it favours a lightweight setup. Realistically, there aren’t many uses that the street photographer would have for an ND filter as you don’t really have any need to slow down the shutter speed. A polariser could potentially be useful if you’re shooting on an ultra-sunny day or near water, but it’s not essential. Plus, there’s the fact that polarisers often need to be rotated to suit the specifics of a scene’s lighting – and as a street photographer, that’s probably time you simply don’t have if you want to nail your shot.
Ultimately, for a good street photography setup, you want to keep things simple – and so, we’ve done just that.
UV filter
Our main filter recommendation for street photographers would be a high-quality UV filter. While you don’t necessarily need the UV-blocking aspect of it, having a layer of protection over your lens is an excellent idea in a discipline like street photography, where you’re shooting handheld, often out in busy environments, and your lens is more vulnerable to being dropped, knocked, splashed or dirtied.
It’s best to get the highest-quality UV filter that your budget allows, as this will ensure that the filter doesn’t compromise the sharpness of your lens. For a good balance of performance and price, we’d recommend the Hoya UX II IV filters, which are equipped with anti-reflective coatings, as well as water/oil-repellent properties. They’re available in a range of thread sizes, from 37mm to 82mm.
Pros:
- Extra layer of lens protection can be a lifesaver
- Relatively affordable and easy to attach/detach
Cons:
- Can have an effect on image sharpness
Best Lens Filter for Portrait Photography
Portrait photography is generally done in quite controlled environments. Even when you’re shooting in natural light, you have the advantage of being able to direct your subject, meaning you can move them around according to how the light is falling. It’s unlikely you’d have much use for an ND filter, and while a polariser could sometimes be useful for making colours pop a bit more, it’s probably not essential.
Instead, it’s worth thinking about how filters could make your portrait photography more creative…
Creative filters
If you want to be able to capture portraits with a difference, there are some more unique filters that could be just the thing to have in your back pocket. While you certainly wouldn’t use them for every shot, being able to offer a creative effect could be just the thing to help you stand out from other photographers.
For instance, Tiffen’s Glimmer Glass is perfect for creating ethereal, dreamlike images that feel different from the norm. The filter softens fine details and makes highlights glow with a shimmering sparkle. For certain subjects, it could be just the thing. Alternatively, you could try the Profoto Clic Creative Gel Kit to imbue images with a specific hue. And again from Tiffen, there’s the Black Pro Mist filter, which provides a softening effect that smooths out skin blemishes – great if you don’t fancy spending ages in Photoshop.
Pros:
- Give your images a unique feel
- Create effects that aren’t easy to replicate in editing
Cons:
- Quite specific use case
Best Lens Filter for Night Photography
You might think that night photography is the last genre in which you’d be using filters – after all, it’s not like you have the luxury of being able to reduce the amount of light getting into your lens. It’s true that if you’re shooting at night, you’re not realistically going to be messing around with NDs or polarisers. However, depending on the kind of night photography you’re planning to get up to, filters can definitely have their uses.
Light pollution filter
One hugely popular form of night photography is capturing images of the night sky. This presents its own unique set of challenges, particularly if you live in an urban or built-up area, as man-made light pollution can make it devilishly difficult to capture clear images of the stars. The ideal solution of course is to drive yourself out to a deeply rural area with minimal light pollution – but that isn’t always a practical option. So, an alternative is to mitigate the problem with light pollution filters.
Light pollution filters are made with specialised glass that cuts out the wavelengths most commonly associated with man-made light sources. They’re designed to minimise the yellowish/greenish cast caused by streetlights and other city lights, as well as cutting out as much as possible the orange-glow associated with sodium and mercury-vapor light pollution. This allows starlight to shine through more strongly, for a cleaner image of the night sky.
It’s important to know that light pollution filters aren’t magic – they won’t instantly remove all the lights of the city and leave you with a crystal-clear nightscape directly above central London. However, high-quality options like the circular Hoya Starscape Light Pollution filters or the square Kase Wolverine 100mm Light Pollution filters can make a real, tangible difference to the clarity of your night photography. Try them and see!
Pros:
- Open up new possibilities for nightscape photography
- Enhances starlight
Cons:
- Generally incurs a stop or two of light loss
- Can’t cut out artificial light completely
Best Lens Filter for Concert Photography
Concert photography is a challenging discipline. With constant subject movement, extreme directional lighting and lots of chaotic things happening at once, a concert is both a difficult and thrilling thing to shoot. As venues tend to be dark, and flash is strictly prohibited, you need as much light as possible coming into your lens – meaning there are very few reasons to stick a filter in front of it. You’re not going to be using an ND or even a polariser – there’s just no realistic use case for them.
However, there is one filter that we would say concert photographers should at least have in their back pocket – even if they aren’t going to use it all of the time…
High-quality protective UV filter
As mentioned, concerts tend to be messy, busy, chaotic affairs. Sure, in an ideal world you’ll be sequestered off in a safe, spacious press area, where you have the perfect angle to the stage, and can take all the time and space to get the shots you need in the first couple of songs, then spend the rest of the set drinking Tuborg. However, this won’t always be the case, particularly when you’re starting out, and you’re likely going to find yourself sharing close space with other people, including photographers, security staff and even regular gig-goers.
As such, a UV filter to secure to the front of your lens can be an invaluable layer of protection if things get hairy. Get one that’s high-quality and you won’t notice any perceptible difference in light transmission or image quality. It’ll just be there as a safety net, to protect the front element of that fast-aperture lens you spent all that money on. Hoya’s Nano II UV filters are a good bet.
Pros:
- Vital layer of lens protection
- Minimal impact on image quality
Cons:
- Arguably an inessential luxury
Best Lens Filter for Wedding Photography
Weddings are wonderful things to photograph. They’re happy, they’re unpredictable, they’re full of moments of charm and wonder. They can certainly be stressful, with a lot of pressure on the photographer to nail the shots they need to nail – but they can be incredibly rewarding for the very same reasons.
Weddings tend to be colourful, with guests dressed up to the nines, with flowers and decorations and fabulous locations. They are also often daytime affairs, and in many cases the people involved will plan their weddings hoping for as much sunshine as possible – there’s a reason that summer is the busy season for weddings. With those things in mind, those who have been reading along so far may be able to guess which filter we’re going to suggest wedding photographers bring to the party…
High-quality polariser
Just as we said – bright sunlight plus vivid colours means a polariser. There also tend to be a lot of things for light to bounce off, from church windows to towers of glassware, so while you may not need a polariser for every wedding shoot, you’d be mad not to at least have one available to you.
As shooting a wedding is generally a professional affair, it’s worth getting the highest-quality polariser you can afford in order to minimise the impact on the quality of your images. Sigma’s WR Circular Polarising Filters are a good bet – available in a range of thread sizes, they are weather-resistant, water-repellent, and designed to provide superior light transmission with minimal vignetting.
Pros:
- Makes weddings even more colourful
- A useful layer of lens protection
Cons:
- Some light loss
Guide to camera lens filter types
In this guide, we’re looking at which types of filters are best for different genres of photography – and to do that, we need to understand the different types of filters available. If you’ve browsed filters before really getting to know how they work, you may have come away quite intimidated by all the different types, sizes, shapes and configurations on offer.
Thankfully, it’s less complex than it looks. The first thing to consider is how you want the filter to attach to your lens, as you have a few different options.
Circular screw-on filters: As it sounds, these filters simply screw onto the front of your lens. They’re quick and easy to attach and detach, as long as you make sure you get the right size for your lens’ filter thread, measured in millimetres (mm). They also provide extra protection for your lens’ front element in the event of an accident, and are the best choice for shooting handheld.
Square/rectangle filters: These types of filter attach to your lens via a dedicated filter holder, which they simply slot into. While the overall setup tends to be more cumbersome in use and less easy to transport, square/rectangular filters are easier to stack for an enhanced effect, with minimal vignetting. They can be more cost-effective if you have multiple lenses with different thread sizes. They’re especially popular with landscape photographers, who are usually shooting on a tripod.
Drop-in filters: Some specific lenses have specific compartments at the rear that are compatible with drop-in filters. If you have the corresponding filter, you can simply slot it in at your convenience. This is more common in large telephoto lenses, with big front elements that aren’t particularly compatible with standard filter sizes.
Next, it’s time to consider the types of filters you want to use. Here are the main varieties we’ve covered in this guide:
ND filters: Constructed from darkened glass, neutral density (ND) filters reduce the amount of light that enters your lens. This allows you to shoot with slower shutter speeds and/or wider apertures in bright lighting conditions, which without the filter would simply result in an overexposed image. ND filters come in different strengths, from mild ones blocking one or two stops, up to heavily darkened filters that block out ten or more stops. Some ND filters are variable, allowing you to adjust the intensity of the effect on the fly.
ND grad (graduated) filters: Graduated ND filters, commonly referred to as ND grads, produce the same effect as an ND, but only over part of the image. This allows you to control for lighting situations where one part of the scene is significantly brighter than another, such as a sunny sky in an outdoor shot.
ND grad filters come in different strengths, as well as offering hard or soft transitions between the dark and light segments. Also available are reverse ND grads, which put the most intense ND effect in the centre of the image – these are useful for shooting sunrises and sunsets, where there’s lots of powerful horizontal light.
Polarisers/polarising filters: Polarisers, or polarising filters, are a filter that can be tricky to explain, but once you see them in action you’ll quickly get a sense of how useful they can be. While most filters are realistically only going to be used by specific types of photographers, we’d say there’s a solid case for just about any type of shooter to have a polariser at their disposal.
Polarisers reduce reflected light that enters the lens. This can have all sorts of effects – making water show up clearer in images by reducing the amount of light reflecting off it, or making blue skies more intense by cutting down on haze. Images shot with polarisers have more intense colours and less glare, making them clearer, sharper and more dramatic.
UV/protective filters: In the heyday of film, protective UV (ultraviolet) filters were hugely useful, as certain film stocks could be quite susceptible to haze from UV light. In the digital era, this isn’t really an issue, but UV filters still have a place as a piece of body armour for your lens. Screwing one on the front will protect your lens’ valuable front element from splashes, mud and dirt – and will also absorb the impact first if the worst happens and you accidentally drop the lens.
Close-up/macro filters: As it sounds, close-up/macro filters allow regular lenses to behave like macros, focusing at super-close distances. While you don’t get the same level of image quality as you would with a true macro lens, this can be a cost-effective way to experiment with shooting close-ups.
Light pollution filters: When photographing the night sky, artificial light pollution can be a huge issue, with man-made light preventing you from capturing the full glory of the stars above. One useful solution is a light pollution filter, which is designed to selectively block out the wavelengths of light most commonly associated with artificial lighting.
Creative/special effects filters: There are plenty of filters out there designed to give your images unusual and creative effects, whether it’s a shimmer effect, a deliberate soft focus or whatever else. While these won’t be the sort of filter you’d use for every shot, sometimes they can be just what you need to introduce a little variety into your portfolio.
Which filter system should I use?
Many manufacturers offer complete filter systems that work with a dedicated holder, making it easy to swap in different filter types at will. While you may prefer to mix and match screw-in filters, buying into a single system can be a great way to keep things simple and maximise consistency between shots.
Here are some filter systems we reckon are well worth considering.
LEE100
For many photographers, the Lee Filters system has long provided the benchmark for quality, with the British manufacturer long ago setting the standard for others to follow. However, in recent years their Foundation Kit holder, first introduced in 1992, had started showing its age, and the company had listened to customer feedback and decided it was time for an upgrade.
The year 2019 saw Lee introduce their new LEE100 filter system holder, compatible with all their existing 100mm filters and adapter rings. Aside from being well-built and lighter, the stand-out improvements include a spring-loaded and lockable release mechanism, as well as the introduction of a new LEE100 Polariser that snaps onto the new holder. This especially was a big improvement over the thin and fiddly 105mm Landscape Polariser, which was attached to a plate that was screwed into the front of the holder. For those who already own the Landscape Polariser, don’t worry – an adapter is available to use it with the new system.
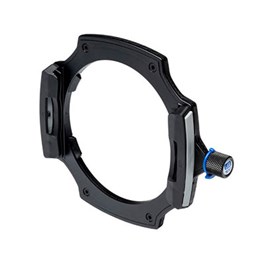
Lee Filters LEE100 Holder
More than twenty-five years ago, LEE set the standard for filter holders. Designed by photographers for photographers, the new LEE100 system is adaptable, intuitive and modular, making it a game-changer in its field. Precision engineered from injection-moulded composite materials, the LEE100 Filter Holder is sturdy, rigid, durable and 16% lighter than its predecessor. The holder is fully compatible with all existing LEE 100mm filters and adaptor rings.
£74.00 View
Kase
Kase has quickly built an excellent reputation and have become the go-to system for many landscape photographers thanks to its filters’ toughened, durable glass and optical performance. Their slimline K9 holder replaces the K8 and is lighter with improved ergonomics. Most importantly, however, it still features a magnetic 90mm circular polariser that sits behind the main filters.
The magnetic polariser is mounted onto a geared ring, which in turn is mounted to the adapter ring. This allows it to sit snugly at the back of the holder, with the option to slot as many as three square or rectangular filters in front of it. An independent dial then allows the circular polariser to be easily rotated without impacting the front filters, and it is still easy to remove even with the holder attached.
The holder has a built-in foam gasket to prevent light leaks regardless of the filter used, meaning this holder can be used with most 100mm square and rectangular filters (2mm thick) made by other brands.
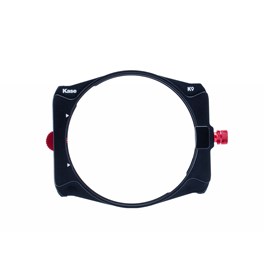
Kase K9 Kit - 100mm Holder with Magnetic Slim Polarising Filter
Introducing the Kase K9 Slim 100mm holder kit that comes with 90mm slimline Magnetic polarising filter. The newly designed, lightweight holder can hold up to three 100mm filters plus the polarising filter at once. The kit comes with adapter rings to fit 67mm, 72mm, 77mm, 82mm Lens Filter Sizes and will work with most 100mm 2mm filters on the market. The K9 features a new method of holding a circular polariser where rather than being mounted as the last filter; the polariser is mounted at the back of the system which will allow you to have up to three Neutral Density or Grad filters in front of the polariser.
£146.00 View
Cokin
The Cokin brand is synonymous with filters and has proven to be an enduringly popular option for photographers over many years. With the release of their EVO holder and Nuance range of filters, they have stepped up the quality to keep pace with the competition.
The EVO is their best holder yet, and while it is more traditional in design than some of the other offerings in this line-up (the 105mm circular polariser sits on a plate in front of the filters), it offers some nice features and excellent build quality.
It has three size options, but the EVO (L) for Cokin’s Z-Pro series is what you will need for your 100 x 100mm and 100 x 150mm filters. This holder will work with most Cokin “CREATIVE” step-up adapter rings, for anyone already invested in the Cokin system.
The EVO holder will take up to 3 x 2mm thick square and rectangular filters from most brands, and to ensure the holder is light-tight, it features a non-abrasive foam that prevents any light leaks or scratches (some filters such as the Lee Little and Big Stoppers have the foam on the filters).
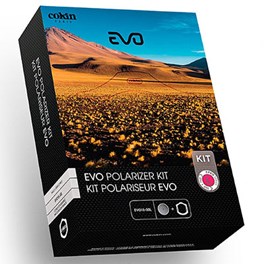
Cokin P Evo Circular Polarising Kit (L)
This polarising kit by Cokin contains the high quality 105mm EVO Polarising Filter and L type EVO holder for Z-Pro series 100mm filters. A 52-82mm adapter ring is required to mount the holder to a lens (sold separately).
£219.00 View
FAQs
What are camera lens filters used for?
Camera lens filters serve many purposes including reducing glare and reflections, improving colour saturation, enhancing contrast and protecting your lens from scratches and dust.
What filter do most photographers use?
It depends on the type of photography but perhaps the most popular filters are polarisers and ND filters. Polarisers are very effective for landscape photography and are often used when photographing outside. ND filters are used a lot within the landscape community to enhance skies and water to give dramatic movement effects.
How do I choose the right camera lens filter for my needs?
Choosing the right camera lens filter depends on what you need it for and your shooting conditions. You’ll need to consider factors such as the type of photography you're taking, the environment you'll be shooting in (bright sunlight, low light, etc.), and the effect you want to achieve (glare reduction, more contrast etc.).
Are camera lens filters necessary?
It’s true that modern digital cameras offer advanced features for image enhancement and manipulation, but camera lens filters still play a crucial role in photography. Filters like UV and protective filters help safeguard the lens from damage, while others like polarising and ND filters provide unique effects that may not be easily replicated in post-processing.
How do we decide?
Our in-house photography experts, store staff and partners all work collaboratively to pour over these guides. The cameras and equipment recommended in our guides are based on their personal opinion, empirical experience and of course, feedback from our customers. We way up price, features, quality and the all-important 'je ne sais quoi' to make sure we recommend products that will delight and inspire.
If you would like more advice on any purchase our contact centre staff are here to help. Alternatively, you can reach us via email or social media. And don't forget. If you were to purchase anything based on our recommendations you'll be covered by our full returns policy